Learn how to do Custom Sort in Excel and sort data with ease: save time and impress your colleagues with these Excel tips and tricks.
Sort only the range of cells you want, without changing the order of other columns!
Become proficient in Excel with Ted Jordan, at your own pace.
Ready to learn how to use Excel Custom Sort feature?
How to Custom Sort in Excel
Custom Sort lists are great to sort in a user-defined order: you can create your own list based on text, for example.
In Excel, there are some custom lists already built by the system: day-of-the-week and month-of-the-year lists such as Jan, Feb, Mar, Apr, May, Jun, Jul, Aug, Sep, Oct, Nov, Dec.
How to sort only some columns in Excel
Sort only the range of cells you want by following the steps below:
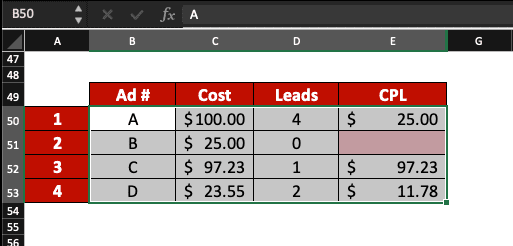
Start by selecting the cells you want to sort.
In this example, we only want to sort columns B to E. We don’t wish to change the order of column A.
We want to know in which order we should use our ads to save money and increase sales (our KPI is CPL, the cost per lead).

In Home, select Sort & Filter then click Custom Sort…

If you selected the headers, you will find them under Column. If you haven’t (like in this situation), untick “My list has headers”.
Select the column you want to sort.
In this example, it’s column E (as a reminder, CPL is our KPI).
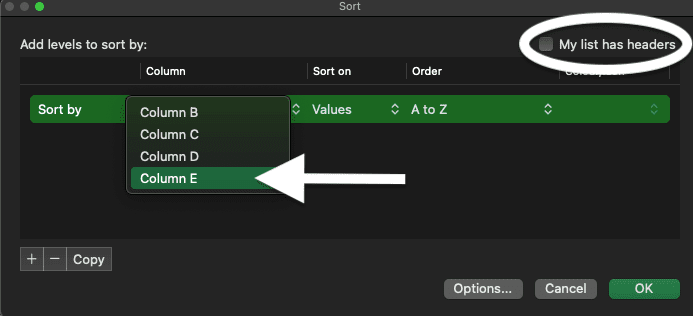

Make sure Sort on and Order are correct then click OK.
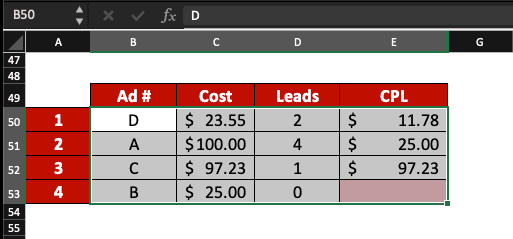
Now, columns B to E are sorted and we know in which order we need to use our ads to save money and increase sales.
What is the Custom Sort shortcut in Excel?
The Custom Sort shortcut is Command+Shift+R in MS Excel.

If you wish to create your own custom list, continue to read our Excel tutorial.
Create your own Custom Sort list
There are two ways to create Custom Sort lists in Microsoft Excel; today we’ll show you our favourite and we will explain how custom lists are stored.
How to do a Custom Sort list
To create a custom list in Excel, follow the steps below:
First, enter your list in an Excel Sheet with the order of sorting preference then press Command+,
Now, select Custom Lists.
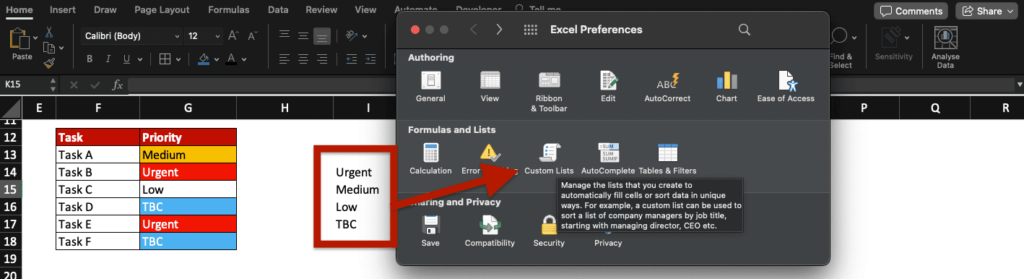
The Custom Lists window opens: it’s time to import your list from cells.
Click the cells selection section, select the cells with your Custom Sort list and click Import.
Finally, close the window. You have now created your own Custom Sort list in Excel!
Use Custom Sort list in Excel
To use the Custom Sort list you just have created, in Excel, select the data you want to sort, press Command+Shift+R and select your custom list in the Order section.
Example
In this example, we want to sort our tasks list by priority order. The priority order follows our Custom Sort list: Urgent, Medium, Low, TBC.
We select our data, press Command+Shift+R then select Priority under Column and click Custom List… under Order.
We then select our own Custom Sort list and click OK.
Now, we know in which order we should prioritise our asks: we have to finish tasks B and E as soon as possible.
How are custom lists stored?
Custom Sort lists are stored in your Excel workbooks. If you use the custom list to sort data, then you will be able to select the custom list in the same workbook, from another computer.
Note that the Custom Sort list will not appear in the Custom Lists section when pressing Command+, but will be available for selection under Order in the Custom Sort window.
Can Custom Sort lists be used on other workbooks?
If you open other workbooks from the same computer you created and saved your Custom Sort lists, you will be able to use your lists.
Now, you know how to do Custom Sort in Excel like a professional. You also discovered the shortcuts to find Custom Lists and to Custom Sort…
Time to get MS Excel certified!


