Learn the foundation of SQL querying with a clear, step-by-step guide on writing a basic SELECT statement.
Introduction
The SELECT statement is the backbone of SQL queries. It allows you to retrieve specific data from one or more tables, making it an essential tool for anyone working with databases. In this article, you’ll learn:
- What a SELECT statement is: The fundamental command for data retrieval.
- Basic syntax and structure: How to construct a simple query.
- Practical examples: Step-by-step examples that illustrate the process.
- Next steps: How to enhance your query with filtering, sorting, and more advanced techniques (check out our Filtering Data in SQL – Mastering the WHERE Clause article for further insights).
If you’re ready to build a strong foundation in SQL, this guide is your starting point.
What Is a SELECT Statement?
The SELECT statement is used to specify exactly which data you want to retrieve from a database. It tells the database engine which columns from which table should be returned, and it can be combined with other clauses to refine your data retrieval.
Basic Syntax of a SELECT Statement
The basic structure of a SELECT statement looks like this:
Explanation:
- SELECT column1, column2, …: Specifies the columns you want to retrieve. Using an asterisk (*) selects all columns.
- FROM table_name: Indicates the table from which to retrieve the data.
Practical Example
Imagine you have a table named employees with columns such as employee_id, first_name, last_name, and department. To retrieve all information for every employee, you can use:

Explanation:
This query tells the database to return all columns for every row in the employees table.
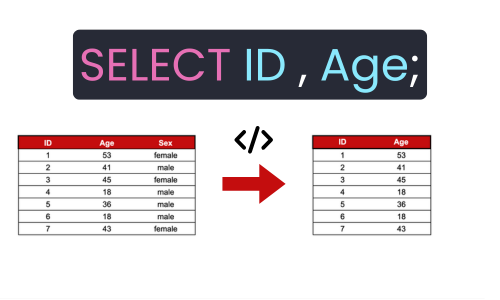
Selecting Specific Columns
If you only need certain information, such as each employee’s first and last name, adjust the query as follows:
Explanation:
This query returns just the first_name and last_name columns from the employees table, making your result set more focused and easier to work with.
Tips for Writing Effective SELECT Statements
- Be Specific: Instead of using
SELECT *, specify the columns you need. This reduces the amount of data transferred and can improve performance. - Use Aliases for Clarity: When working with multiple tables, use column aliases to make your output clearer. For example:
- Practice Readability: Format your queries with line breaks and indentation, especially when dealing with more complex queries.
- Test Your Queries: Use your SQL editor to run queries and check that they return the expected results.
Next Steps
Now that you know how to write a basic SELECT statement, consider exploring further:
- Filtering Your Data: Learn how to refine your results using the WHERE clause (see our Filtering Data in SQL – Mastering the WHERE Clause article).
- Sorting and Grouping: Discover how to organize your query results with ORDER BY and GROUP BY.
- Advanced Query Techniques: Once you’re comfortable with the basics, dive into joins, subqueries, and more advanced SQL concepts.
For more in-depth training and practical examples, check out our comprehensive SQL course.
Conclusion
Mastering the basic SELECT statement is the first step in becoming proficient with SQL. With a clear understanding of how to specify the columns and table from which to retrieve data, you’re well on your way to building more complex and efficient queries. In our upcoming articles, we’ll expand on these fundamentals and explore additional techniques to manipulate and analyze your data effectively.
Stay tuned for our next article: Sorting Data with ORDER BY – Organize Your Results.
Have questions or tips about writing SELECT statements? Leave a comment below or join our community for interactive learning and support.